Sharing a VPN connection with VMWare fusion
Rationale
My company has set up a VPN access that can be used from home. This proved to be extremely useful last winter when I got snowed in, and I have used it occasionally ever since.
The VPN system we use (Sonicwall) is not supported on MacOS X, and Sonicwall only provides connection software for Windows. I have tried to use IPSecuritas but I could not find a way to configure it properly. The commercial software VPN Tracker worked like a charm, but when I saw the price (€99 excl VAT) I stopped considering it. For about half of that price ($60 excl VAT) you can get a license to VMWare Fusion.
So, I decided to VMWare Fusion for my VPN access. The obvious disadvantage is that VMWare uses a lot of resources, but this is not really a problem for me. In addition, the setup is difficult but hopefully this post should help you with that. The obvious advantage is that, of course, VMWare can do a lot more than provide access to a VPN!
Summary of the Setup
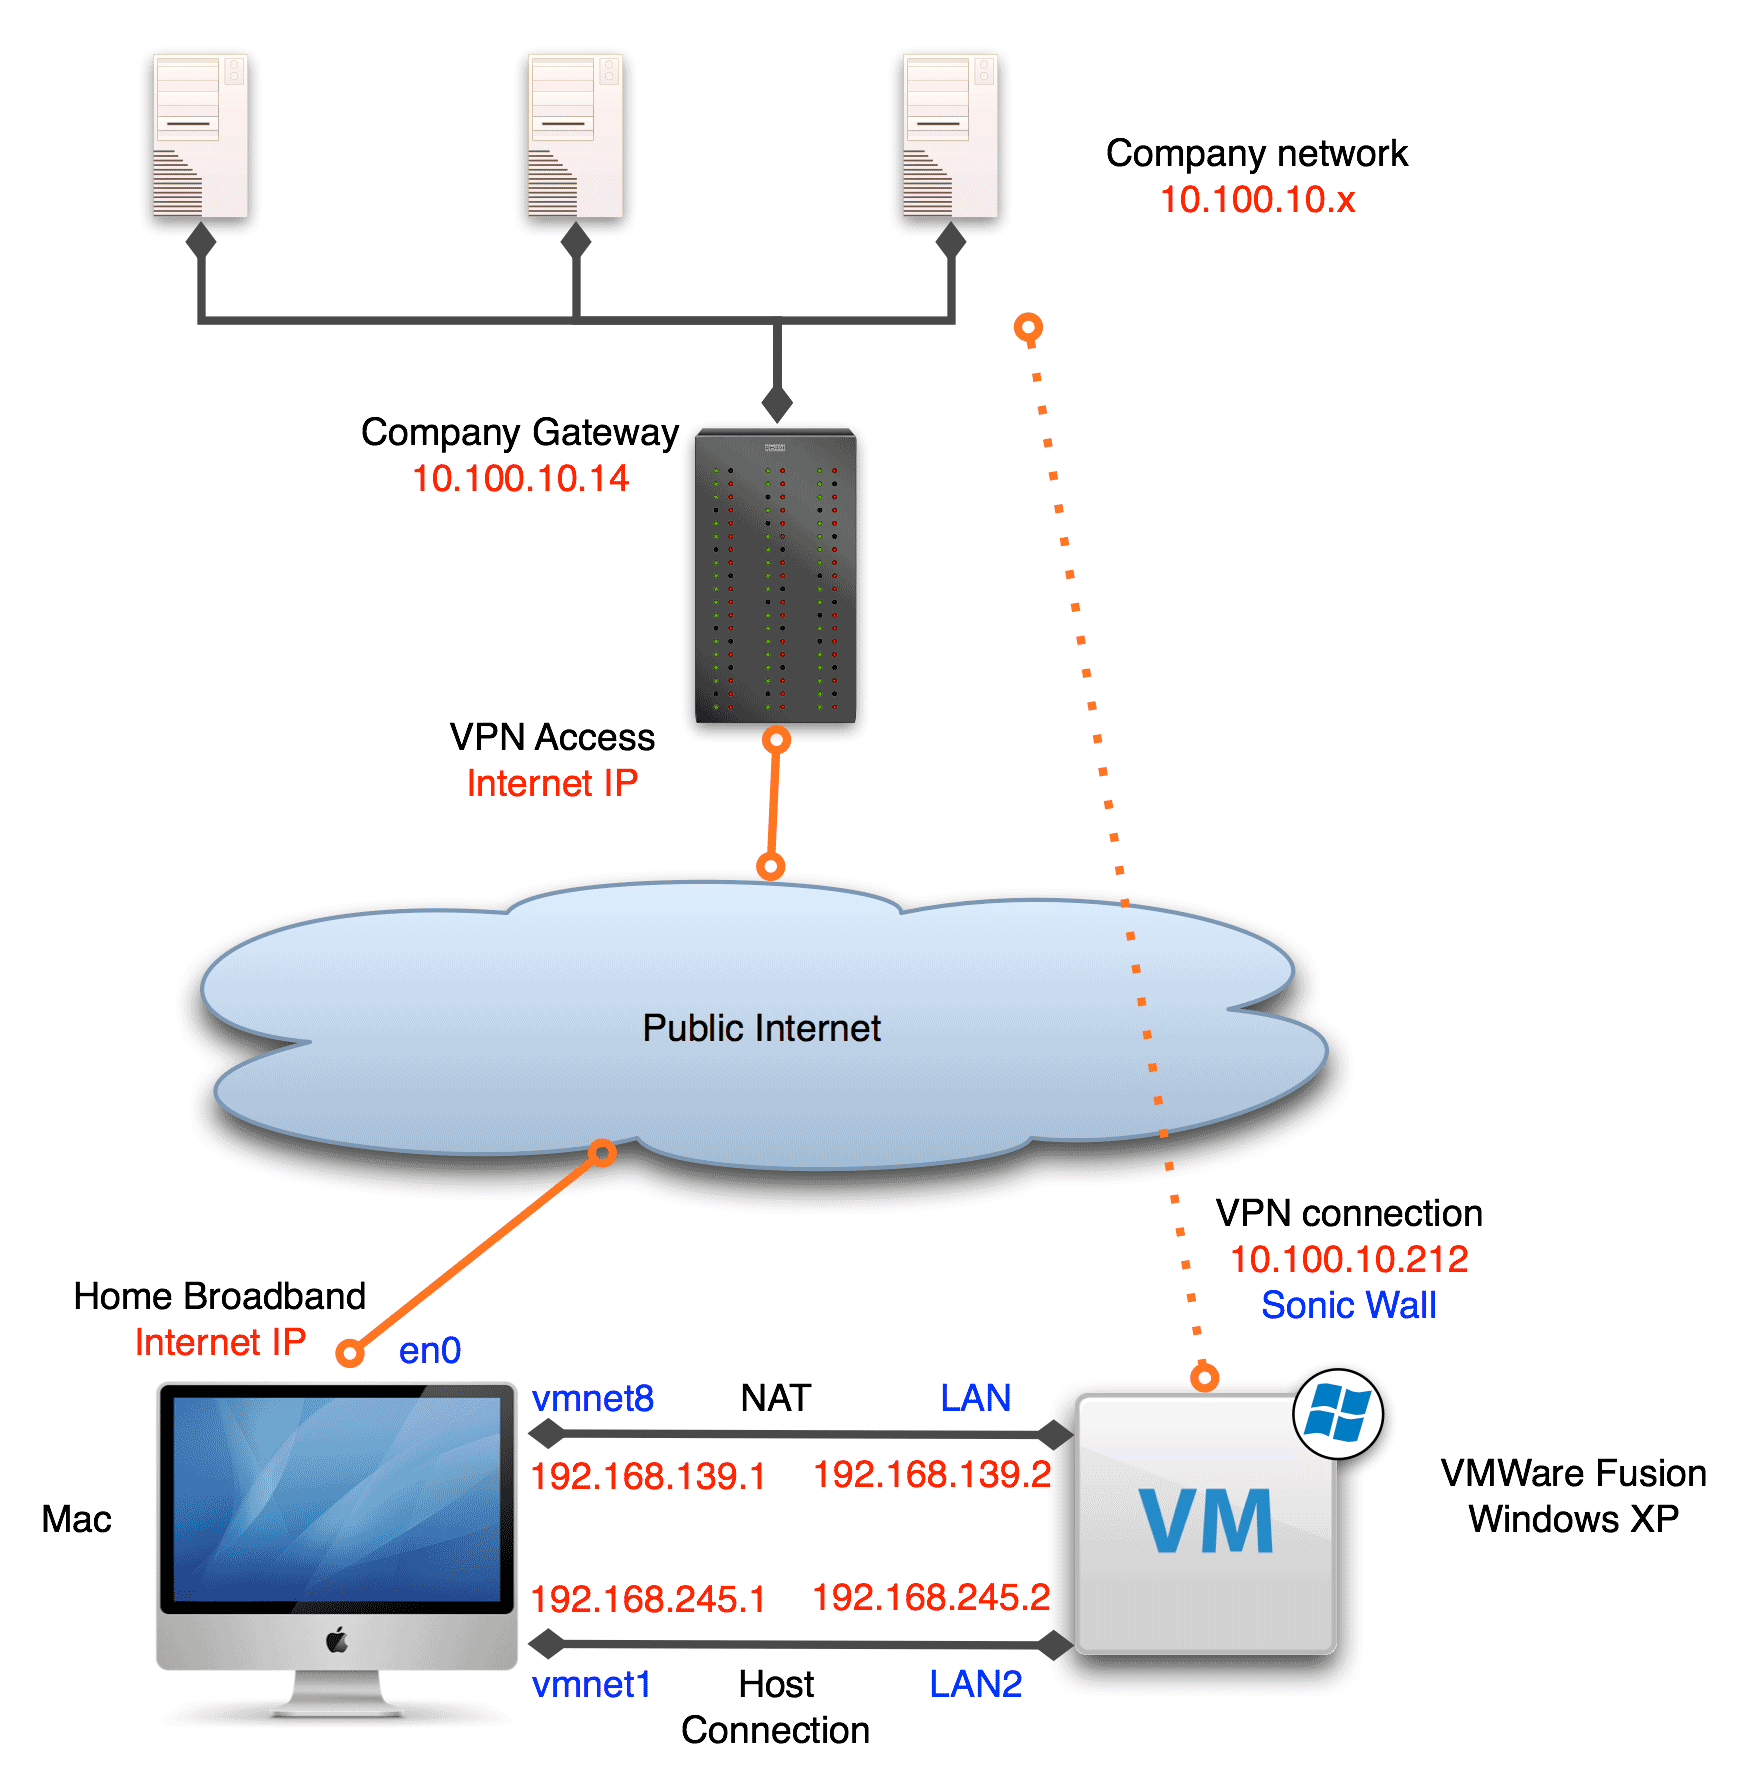
My goal is to access the company network (10.100.10.x/24) from home on my iMac running Mac OS X 10.6. Since the VPN software is only supported on Windows, I connect to the VPN via Windows XP SP3 running inside VMWare Fusion. The virtual machine Internet connection is provided via a NAT network interface connected to the iMac.
My setup consists in creating another network interface between the iMac and the VM. Then, I configure both Windows and MacOS X so that my packets get properly routed.
A picture is worth a thousand words.
Setting up VMWare Fusion
I assume that you have correctly installed the virtual machine, Windows XP, and that the VPN software works as expected. My network configuration uses NAT to provide internet access to the VM, but it is certainly possible to use other configurations.
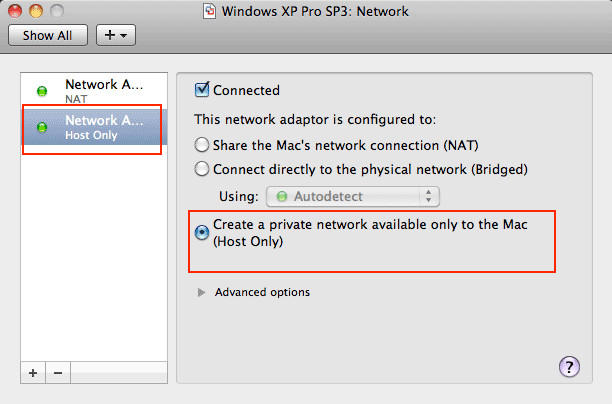
The first thing to do is to create a new network interface to provide access to the VPN from the Mac to the VM.
Steps
- Switch off the VM
- Go to “Settings”, “Network”
- Add a network interface with the “+” button at the bottom.
- Choose “The host only” option at the bottom.
Setting up Windows XP
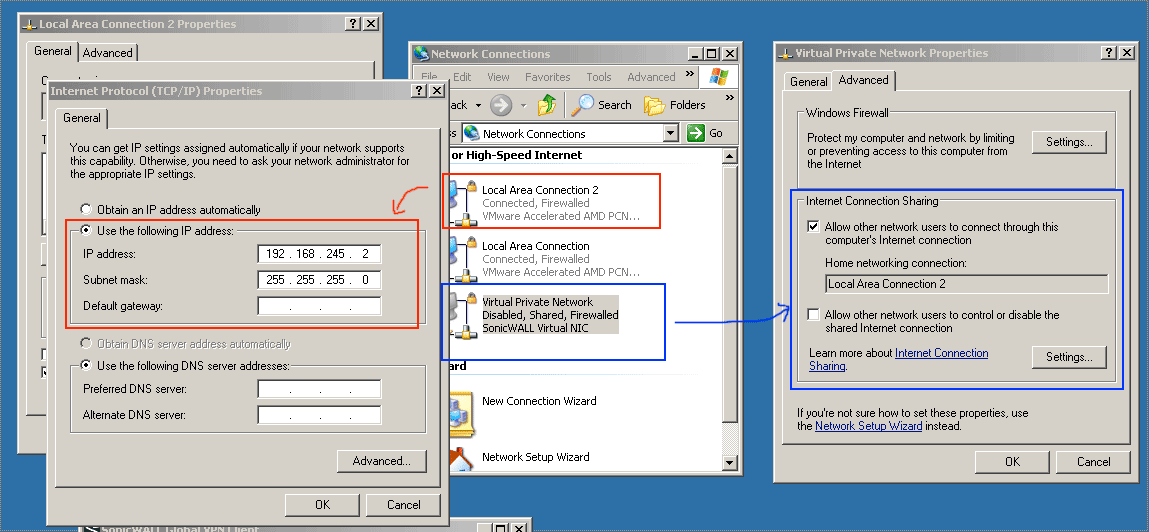
The next part of the setup consists in configuring the newly created “Local Area Network 2″ interface (LAN2) so that it shares the connection with the VPN. We need to share the internet connection from the “Virtual Private Network” interface to the LAN2 interface. We also need to enable IP packet routing.
Steps
- Sharing the connection
- Go to “Control Panel”, “Network Connections”.
- Right click on the “Virtual Private Network” interface, select “properties”, go the the “advanced” tab and select the option “Allow other network users to connect through this computer’s Internet connection“.
- In the combo box below select “Local Area Network 2″.
- Deselect the option “Allow other network users to control or disable the shared Internet connection”.
- Click on “Ok” to validate the settings.
- Enabling IP routing
- Open “regedit.exe”.
- Go to
HKEY_LOCAL_MACHINE SYSTEM\CurrentControlSet\Services\Tcpip\Parameters. - Locate the key
IPEnableRouterand set it to1. - This setting is different on older or newer versions of Windows.
- Set up Local Area Network 2 interface
- Open the “Terminal.app” application on the Mac and type “ifconfig”.
- Note the IP address (inet) associated to the “vmnet1″ interface and the network mask. In my case it’s 192.168.245.1 and 0xffffff00.
- Go the “Control Panel”, “Network Conections” on the VM
- Open the “Local Area Network 2″ interface properties window.
- In the “general” tab, double click on the “TCP/IP” item.
- Choose an IP address on the same network than the one from the Mac, and set the network mask. In my case, I chose 192.168.245.2 and 255.255.255.0.
- Click “Ok” to validate the settings
At this stage, although this is not strictly necessary, you may want to enable the ping on Windows XP, to verify that your connection works.
- Go to “Control Panel”, “Windows Firewall”.
- Go to the “advanced” tab and select “settings” in the “ICMP” section.
- Enable the “allow incoming echo request” option.
- On the Mac, open “Terminal.app”
- Type
ping 192.168.245.2and the Virtual machine, should normally reply to the ping. If it does not, you may have made a configuration mistake. Useifconfigon the Mac andipconfigon Windows to debug the issue.
Setting up Mac OS X
At this stage we need to set up Mac OS X routing so that VPN addresses are resolved through the vmnet1 interface. We also optionally set up the company DNS. If you have not done it yet, you should connect to the VPN from the virtual machine.
Steps
- Once you are connected to the VPN on Windows, launch “cmd.exe” and type “ipconfig /all”.
- Look for the following details: your IP address on the VPN network, the mask, and the addresses of the VPN.
- In my example I have an IP of
10.100.10.212, a mask of255.255.255.0and two DNS servers at addresses10.100.10.12and10.100.10.14 - Go back to Mac OS X.
- In the terminal type a command line similar to
sudo route -n add 10.100.10.0/24 192.168.245.2. (Or alternatively if you do not wish to worry about the CIDR notation for the mask,sudo route -n * add 10.100.10.0 192.168.245.2 255.255.255.0) - The first partial IP corresponds to the IP of your network (normally the first digits, until the mask is zero).
- The second IP is the IP of the VM on the LAN2 interface.
- This line instructs MacOS X to route all IPs from the
10.100.10.xnetwork to the192.168.245.2gateway, i.e. the virtual machine. - You must the enable IP routing. Type
sudo sysctl -w net.inet.ip.forwarding=1.
At this stage you should be able to ping yourself on the VPN from the Mac. In my example ping 10.100.10.212 should reply. Now what if it does not work
- Try
traceroute 10.100.10.212. If you see your message routed through your normal internet connection, then something is wrong on the Mac. Otherwise it’s on Windows. - On the Mac
netstat -rnwill dump the route table. - Verify that you still have an internet connection, on the Mac and the VM. If you do trash your route table you may lose it entirely. (Try removing your incorrect route with “route delete …” and/or plug in and off your modem connection).
Optional Steps to Set Up the DNS
- Go to “System Preferences” on the Mac.
- Select “Network”.
- Click on “Advanced” at the bottom of the interface that provides your internet connection.
- Go to the “DNS” tab. In the “DNS server” sections add the DNS servers of your VPN, on top of the list. In my case it’s 10.100.10.12 and 10.100.10.14.
- Close, validate and do not forget to “apply” the settings.
Going Further…
- You can snapshot the Windows virtual machine to retrieve your settings next time.
- On the Mac you can put the combination of the
routeandsysctlcommands in a script to further automate the process. Maybe it’s possible to write a launchd script and do it at startup - I’m not sure how to configure the DNS from the command line, nor how to make the DNS of the company be used only for domains unknown from your regular DNS server.